Heat Press Tips & Best Practices
 |
Temperature: Using the correct temperature for your paper or HTV and substrate fabric is crucial. Refer to the instruction sheets provided with your heat transfer paper or HTV. Allow your press to heat up to the correct temperature before using. If your heat press does not have a reliable temperature gauge, invest in an add-on temperature control unit such as the Geo Knight Digital Pyrometer & Surface Probe Kit. This unit is universal and will work with most machine brands. It's also recommended that you check your press for cold spots once a year using a laser temperature gun. |
| Time:
Use your heat press timer function or your cell phone stop watch app and refer to your heat transfer paper or HTV for proper timing using the substrate you are pressing onto. To Achieve Professional Results: Pressure: |
|


| Lower Platen Teflon Heat Wrap: A lower platen teflon heat wrap helps to protect the heat press rubber pad from vinyl and inks. It prolongs the life of the rubber pad from wear and tear and provides a more slippery surface for pulling garment on and off. Quality: Teflon Sheet: In a pinch you can also use household baking parchment paper.
|
|
 |
Pockets and Harder to Reach Areas: Thermal Heat Tape: |
Transfer Placement & Alignment Tips:
There are many tools to help with transfer placement, but one simple way is to apply a straight transfer is to fold the garment and press so that you have a center line. Then, fold the carrier sheet of your transfer in half and line up both creases. Make sure that the transfer image has the same amount of paper on either side to ensure the transfer will in fact be center of the shirt. Remember to mirror your image where required by the product.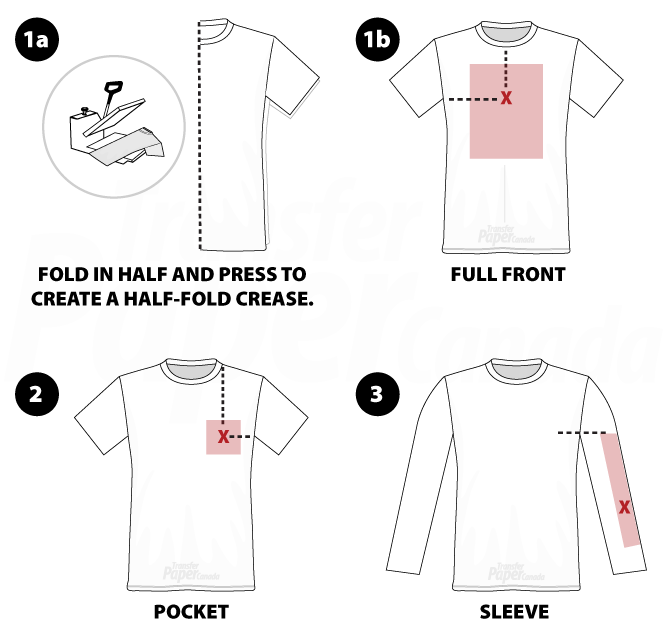
Power & Safety Tips:
- Avoid overloading circuits and place your heat press machine on a dedicated circuit if possible. Or, avoid using other equipment at the same time that shares the same circuit.
- Avoid using extension cords. If you do, make sure the amperage of the cord is equal to the press machine to avoid overheating. Check your heat press manufacturers recommendations.
- Keeping your heat press clean is a must as you don't want old, melted vinyl to apply to a new job.
- Pressing Large Jobs: If your job is larger than your heat press platen, press the job in stages. Overlapping the pre-pressed area a little is generally okay, but best to do a test application prior.
Trouble-Shooting:
Marks from the transfer paper. Put a 1⁄2” thick felt pad under the garment to elevate it. It should be bigger than the design, but SMALLER than the size of the paper. This way, the transfer paper hangs over the felt pad, and doesn’t make stamp-marks from the edge of the paper digging into the fabric, because it overhangs the pad. Universal White Nomex Heat Felt pad.
Marks from the bottom rubber pad support. Round off the edges of the bottom rubber silicone pad on the press. Use a hand-grinder / hand-sander and chamfer/round off the sharp edge so it is soft, smooth, tapered, radiused. Then there won’t be an instant sharp drop-off in pressure causing a press-mark / stamp-mark in the shirt. A soft drop in pressure results in a softer mark or lack thereof in the shirt surface.
Discolouration of fabric from heat. Some dyes and fabrics, especially coloured shirts, will react to heat and shift in colour. A lighter shade of the colour is typical after pressing when this is an issue. Sometimes, the colour and garment overall will recover after a few hours, and setting the garment aside and looking at it later in the day in a different light will reveal the issue was only temporary. If the colour shift remains, you must find the highest temperature that does not do this, by lowering the temperature setting in 25 degree increments. Raise the time setting to compensate for this. Often times, that particular shade/dye/shirt simply will not work with the transfer settings/recipe/requirements and a different shirt brand & dye must be used.
Scorching of fabric from the heat. Some soft & sensitive fabric will have a shiny surface everywhere it has been heated, due to a Scorching/Searing effect of the heat platen on the material. Velvet, Suede, and other similar surfaces will be seared and flattened to an undesirable appearance. This is just the nature of pressing this material at the temperature the transfer or applique requires. A BOTTOM HEAT Platen/Attachment is an excellent solution to this issue. A Bottom heat platen (not available on all presses - contact the factory) allows the top heat to be turned down or turned off. The heat comes from the underside of the fabric, draws the adhesive through the fabric for excellent adhesion, and there is no direct heating or searing/scorching of the surface from the top side.
=